In my last post, I discussed troubleshooting a golf with an intermittent problem. As a matter of fact, I had the opportunity to go through the process on my own cart, right while I was writing the post. I was cruising along in my old Hyundai electric cart, when all of a sudden, BAM! The darned thing just acted like someone reached over and shut off the key switch (which nobody did). Of course I didn’t have a meter or any tools with me (that wouldn’t be fair), but as I discussed in the post, I was able to learn a little about what was begging for attention, just by listening carefully to what the Solenoid was doing (which was NOTHING).
The Solenoid is such an important part of the operation of the cart, that I spent a whole chapter discussing it in the book that I wrote about electric golf cart repair called Electric Golf Cart Repair 101 (and a half). For more information about the book, just click HERE. But in this post, I would just like to review what the Solenoid does and what it takes to make it happy.
I always say that the Solenoid is where the High Energy circuitry and the Low Energy circuity meet. I have taken a drawing of a typical example of an early common cart that we can use for discussion from the book I mentioned. This is it:
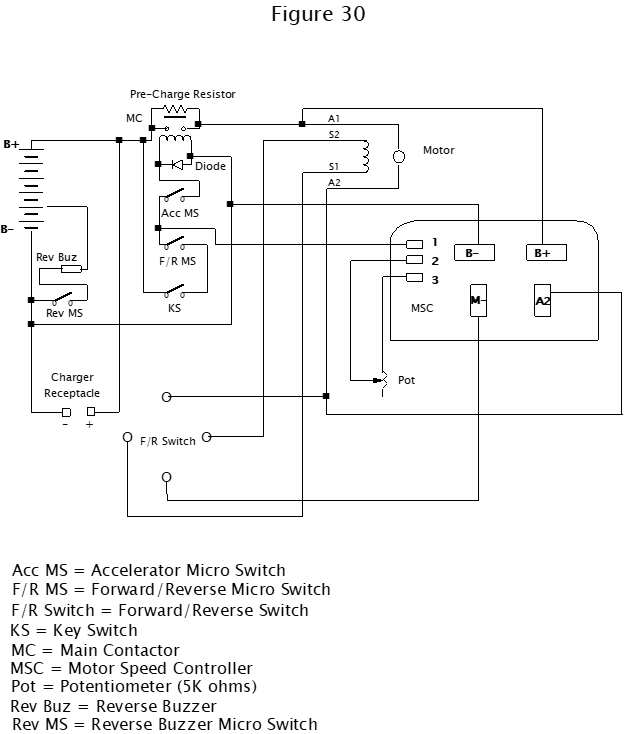
A more simplified block diagram could look like this:

I know that the simplified version of the drawing looks a bunch different than the original, but functionally, they are the same. The battery pack provides energy to two very different paths. The things that brings these two paths together, (yea, you got it), is the Solenoid.
The logic switches, in this type of cart, consist of the Key Switch (KS), the Forward/Reverse Microswitch (F/R MS), and the Accelerator Micro Switch (Acc M/S). In different makes and models of carts, they may appear in a different order, but they do the same thing: that is to energize the Solenoid. On later carts, the Motor Speed Controllers are much more sophisticated, and these switches may connect directly to the Controllers and then the Controllers connect directly to the Solenoids, but the idea is the same. You still have a Low Energy path and its components controlling a High Energy path.
The Solenoid unites the two paths. The Low Energy path provides current flow through a coil of wire in the Solenoid. This “Coil”, when supplied current, provides a strong magnetic field. This field then pulls on a “plunger” that forces two surfaces together on its “contact” side. So, we have two sides of the Solenoid: a Coil side and a Contact side. Because the current required to create the magnetic field is very small compared to the current required to run the motor, the amounts of energy used on the Coil side and on the Contact side are referred to as the Low Energy and High Energy side respectively.
So, let’s take the cart that I was forced to work on (my old Hyundai). Because I LISTENED CAREFULLY when it croaked, I was able to determine that the Solenoid was NOT going “clunk” (providing the High Energy path). Of course (as usual), by the time I pushed the cart home (90 degrees with humidity of 90% in Florida) where I had some tools and a meter, it did the inevitable, and started working again, even though I had done nothing to fix the problem. But this time, I put my faithful Fluke 115 (meter, not a gun) in the glove box of the cart and took it for another ride (after the weather cooled off a bit). Sure enough. It croaked again. So, I started with my meter at the Solenoid. All through the book I wrote, I constantly recommend starting at the Solenoid. There, you can get an Idea of what is going on with both paths. In my case, I had 36 volts at the Coil of the Solenoid when I satisfied the requirements of having the KS on, the F/R MS activated (cart in Forward) and the ACC MS activated. This brings up an important issue. You really should have the back wheels off of the ground, in case the cart decides to take off (correct itself). In the book I tell several stories of people (including me unfortunately) who were not careful at this point of the operation and had a cart run away from them, perhaps even dragging them along for the ride (that happened to me once). Anyway, in my case, when the cart acted up, I was not where I could get the wheels up, but I knew enough (from experience) to very carefully depress the Acc M/S to make the final logic switch connection (just barely far enough to where the cart should have started moving). Remember, if you activate the Acc M/S by pushing the accelerator WAY down, and then the cart decides to work, for some reason, OFF YOU GO.
So, once I determined that the 36 volts was present where and when it should have been and checked the other side of the coil to make sure it went to B- (as indicated in the drawings), I knew the problem had to be the Solenoid itself, which it was. That brings up another thing that is worth talking about. It is very possible for a Solenoid to go bad in such a fashion that it goes “clunk” as it should, but it still isn’t working. If the surfaces that provide the current flow on the Contact side of the Solenoid don’t make GOOD contact, you can be fooled into thinking the Solenoid is good when it isn’t.
So, with that in mind let’s say that when I listened and heard the “clunk” when the cart croaked, the Solenoid still could have been the culprit. When testing for that condition, you need to check the Contact side of the Solenoid and see what is happening. The Contact side makes connection to the outside world through two large terminals. They are much larger that than those for the Coil side to facilitate the larger amount of current they are required to handle and therefore they have to make room for much larger wires to connect to them. The standard connection wire size on the Contact side for most carts is 6 gauge (or larger, maybe even 4 gauge). On the Coil side, a common connection wire would be around 16 gauge (a huge difference). As a matter of fact, you can learn quite a bit about a golf carts components just by looking at the wiring that they are connected to (small wire = Low Energy side and large wire = High Energy side).
Back to testing the Contact side of the Solenoid. When the Solenoid goes “clunk”, because the Contact surfaces in it are made of heavy material and are GREAT conductors of electricity, there should be virtually NO resistance between them. The B+ that is connected to one of the terminals on the Contact side, should appear exactly the same on the other one (that goes off to the Motor, Speed Controller, etc. So, when you hear the Solenoid go “clunk”, the voltage at the Contact terminals on the Solenoid should be EXACTLY the same. The misleading part of this test comes up because most of the carts (as in our first drawing) have a Pre-Charge resistor connected across the Contact terminals in addition to the other large wires. This resistor is used to keep the Motor Speed Controller “ready” for action and does so, even when the Solenoid is not energized (it is wired directly across the Contact terminals). So, even without the Solenoid energized, you will still see (with you meter) a voltage on the Contact terminal that doesn’t go to B+ (the one that goes off to the other components). The secret is that the voltage will be a SLIGHT bit lower when the Solenoid isn’t energized. It only takes a small amount of current to keep the Controller ready to roll, so the voltage drop across the resistor is small, but it DOES exist. Typically, before the Solenoid is energized, you would read B+, of around 38 volts or so, on the B+ terminal and only about 37.5 volts or even a little less on the other side. But when the Solenoid is energized, the voltages measured on the Contact terminals should be EXACTLY the same.
So, in conclusion, I think the place to start troubleshooting a problem with almost any golf cart is at the Solenoid. If the logic provided Coil voltage isn’t there, you would go back through the switches and see which one (or the connection to it) is at fault. If the Coil voltage is there, and the Solenoid DOESN’T go “clunk”, then you probably have a bad Solenoid (like I did). But if the Solenoid DOES go “clunk” (but the cart still doesn’t work), don’t be fooled. You still have to eliminate the Solenoid by verifying the Contact voltages. If the Solenoid goes “clunk”, and the Contact voltages are correct, then you are off to the High Energy side to continue the troubleshooting process. Either way, STAR WITH THE SOLENOID, and hopefully your findings will point you in the right direction. Good luck!
Ron Staley has published the following books, and you can get more information about them by just clicking on each title below:
Electric Golf Cart Repair 101 (and a half)
Techniques, Tips, Tools and Tales
Gas Golf Cart Repair 101 (and a half)
Techniques, Tips, Tools and Tales
4-Stroke Golf Cart Engines Explored
What Makes Them Tick
By an old Slot Machine Mechanic